

Credit: Saintytec
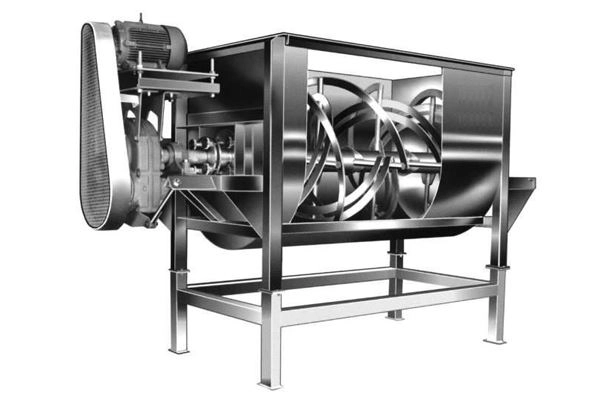
The type and quantity of blenders you choose for your process will have a big impact on how quickly and successfully your recipe comes together. There are a lot of various methods to personalize your ribbon blender, and picking the correct one might be challenging. Here are a few things to consider when selecting a ribbon blender for your ingredients and process. Also, you can see the three types of blenders
5 Things to Think About When Choosing a Ribbon Blender
1. Type of Ribbon or Agitator
By agitating materials with a corkscrew-like metal blade, a ribbon mixer successfully combines them. The product is moved in one direction by the outer helix of the ribbon, while the material is moved in the other direction by the inner helix of the ribbon. The material is moved from one end to the other, resulting in a quick but gentle mixing motion. If greater shear is required to modify the properties of the components, the mixer can be run at a faster speed, or additional devices, such as high-speed choppers, can be added to the mixer. Some materials may perform better in a mixer using paddles rather than ribbons as the agitators. This is especially true for ingredients that contain a lot of liquid or are sensitive to shear. When creating a ribbon mixer or any form of mixer, choosing the proper ribbon or agitator type is critical. The sort of agitator you’ll need will be determined by the components you’re using, as well as the amount of time you’ll be mixing and the mixer profile you’ll be using.
The considerations listed below might assist you in deciding the sort of agitator to employ:
- Friability: In contrast, if your materials are likely to break while being mixed, a softer agitator, such as a paddle mixer, may be used. This process will be helped by mixing at a slower pace, which we’ll describe later in the essay.
- Shear: Your agitator may require more shear if you’re working with thick or viscous materials. The quantity of energy that flows into the mix may be enhanced by adding the agitator’s speed and the tolerances between the mixer body and the agitator. In general, higher shear necessitates more horsepower.
- Single or double ribbons: The entire mix time for the process can be reduced by using mixers with two sets of agitators. Ribbons, paddles, or a mixture of the two are used in these mixers. Using two agitators will also increase the necessary horsepower.
2. Size and Volume
When choosing a ribbon blender, the capacity and profile of the blender are the most significant factors to consider. This will vary depending on how much material you’re combining and how quickly it has to be blended. A very big blender may be appropriate in some instances. Multiple smaller blenders might also assist you to optimize the procedure in some circumstances. You can prevent a shut-down if something goes wrong with several blenders, and you can cut the time it takes to mix a batch in half.
To produce the most efficient mix, fill the ribbon mixer to its swept volume. The agitator’s swept volume is the amount of space it takes up. The mixer profile is also vital for getting the optimum mix in the quickest period. The mixer should not be longer than 2.5 times the agitator’s diameter. To choose the proper size ribbon blender, consider the vessel’s length, breadth, height, and volume, as well as the agitator size.
3. Horsepower
Most ribbon mixers spin at roughly 20 RPMs, but those with multiple agitators or larger ribbons will need more power. In a single-agitator ribbon blender, a common rule of thumb for medium-density material is 10 horsepower per tonne of material being blended. Use a motor with the proper horsepower to choose a mixer that is both effective and efficient. The mixer’s manufacturer can assist with motor sizing and type. Choosing a motor that is too strong can result in additional costs, yet underestimating the motor’s power might result in the mixer being unable to start under load.
4. Mixer Construction Materials and Finish
Both mild and stainless steel is used to make ribbon mixers. The construction materials will be determined by the ingredients that are being combined and how those ingredients will be utilized. When working with food-grade ingredients, for example, the mixer should be made of stainless steel with particular coatings that make it easy to clean and sanitize. If the contents are corrosive, stainless steel would be a better option, since mild steel would be dissolved over time by the substances. Other materials or finishes may be required by your materials or process. These finishes may not be required if your materials are not vulnerable to foodborne illnesses.
The outside of the mixer, as well as non-contact parts, are frequently composed of mild steel and painted. Because it might contaminate the substances being mixed, the interior of the mixer is normally not painted. Material can be coupled to a mixer to improve its performance. This is most common when a substance is abrasive and would wear down the inner parts early. If you’re working with corrosive materials, you may need to use a different finish. To fit your facility’s needs, your ribbon mixer may be customized with a variety of materials, finishes, and paint colors.
Ribbon mixers are commonly made using the following materials and finishes.:
- Weld finishes range from normal to sanitary
- Epoxy paint or industrial enamel paint
- Food-grade stainless steel
- Ceramic and UHMW plastic linings are abrasion-resistant
5. Discharge Ghate
When configuring your ribbon blender, consider how your contents exit the mixer. The optimal ribbon blender will be determined in part by the cycle time and downstream processes. Some processes may necessitate a complete and immediate stop. A full-length drop-bottom discharge gate would be suitable in this case. Other procedures may require a more slow discharge or a tighter seal, in which case a slide gate may be preferable.
For your ribbon mixer, the most frequent types of discharge gates are:
- Drop bottom: A drop bottom discharge gate will quickly release all ingredients in the mixer. Even though these gates are rapid, establishing a tight seal, especially when working with small particles, can be challenging. This rapid discharge may cause dust to escape into the air, needing proper mixer venting.
- Pneumatic Slide Gate: A sliding gate allows a certain amount of material to leave, which can aid in the measurement, batching, or bagging of materials after mixing. To prevent powder from leaking, these will have a tight seal.
- Multiple Slide Gates: You may utilize numerous gates to speed up the process while keeping preventing powders from escaping if you want a faster discharge rate and a tight seal.
Getting the ideal mix requires selecting the proper ribbon blender and configuring features to fit your process and materials. Many issues and difficulties may be avoided both upstream and downstream if consistency and precision are built into your process. Work with a vendor that can help you customize these features to meet your process and test them to make sure they’re a good fit.
If you are looking for any kind of machinery contact Adroit Machinery
